


Walk a commercial job after the first-years have been running EMT and you can read the learning curve on the ceiling. One saddle sits a half-inch off the pipe it was meant to clear. An offset into a box lands a little past the knockout. A 90 comes up an inch too tall, so somebody cut it and reamed it twice. None of it is dangerous. All of it is wasted conduit and wasted time.
Almost every one of those misses comes from the same few numbers: the multiplier for the angle, the shrink you forgot to add, and the take-up stamped on the bender head. Bending looks like a feel skill, and part of it is. But the layout is arithmetic, and if the arithmetic is wrong, no amount of feel in your foot will fix it.
Study smarter with VoltageLab
Built for electricians, apprentices, and electrical engineers who want faster practice and better exam prep.
⭐️ Join thousands of electricians upgrading their skills
This guide covers the marks on a hand bender, how to lay out a stub-up 90, a back-to-back, an offset, and a three-point and four-point saddle bend, the multiplier and shrink tables, and the NEC rules on bends in NEC 358.24, 358.26 and Chapter 9 Table 2 that decide whether the run passes inspection.
Quick Answer
A saddle bend takes conduit up and over an obstacle, such as a pipe, and back down to the same plane. The common three-point saddle uses a 45° center bend and two 22.5° outer bends. Move the center mark ahead of the obstacle’s center by 3/16″ per inch of saddle depth, then place the two outer marks 2-1/2″ per inch of depth on each side of it.
For a wider obstacle, bend a four-point saddle instead: two offsets back to back, laid out with the offset table (a 30° offset uses a 2.0 multiplier and 1/4″ shrink per inch of depth). Every saddle counts toward the 360° limit between pull points in NEC 358.26 — a three-point saddle uses 90° of it.
Key Takeaways
- Offset multipliers are the same for every conduit size: 6 at 10°, 2.6 at 22.5°, 2 at 30°, 1.4 at 45° and 1.2 at 60°
- Shrink per inch of offset depth is 1/16″, 3/16″, 1/4″, 3/8″ and 1/2″ for those same angles
- A three-point saddle is 45° in the center and 22.5° on each side, with outer marks 2-1/2″ per inch of depth from center
- For a stub-up 90, subtract the take-up stamped on your bender from the stub height you want
- Klein publishes take-ups of 5″ for 1/2″ EMT, 6″ for 3/4″ EMT and 8″ for 1″ EMT on its benders
- NEC 358.26 allows no more than 360° of bends, offsets and saddles included, between pull points
- NEC 358.24 bans bends that damage the conduit or reduce its inside diameter, and Chapter 9 Table 2 sets the minimum radius
How a hand bender works — the marks on the bender head
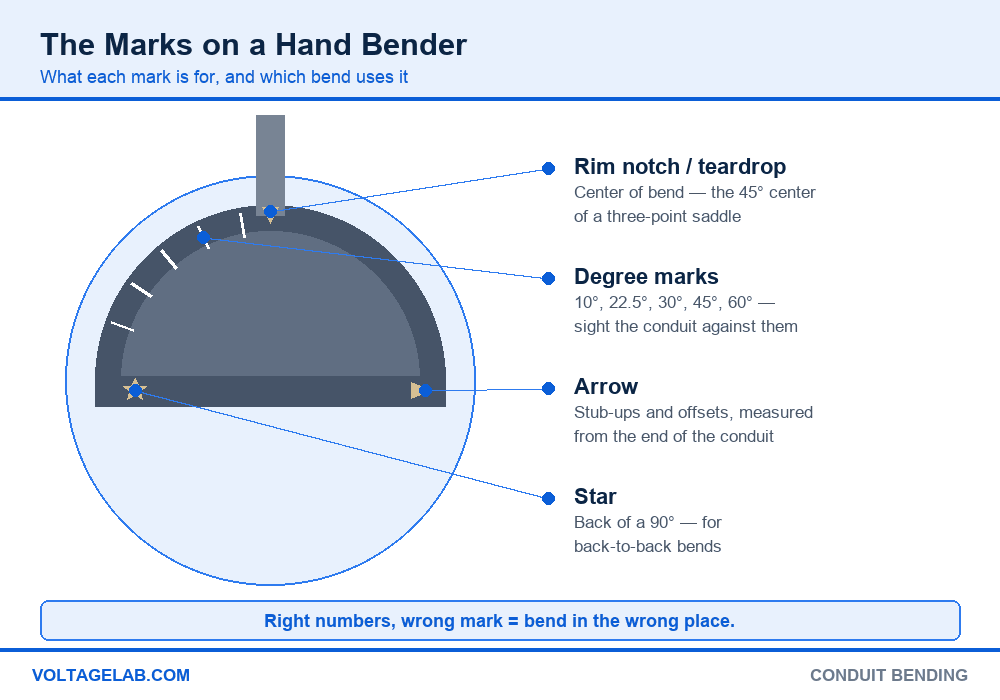
Every layout method in this guide assumes you know what each mark on the bender head is for. Brands differ in detail, but a standard EMT hand bender carries the same five:
Pass your electrical exam the first time
Practice real NEC exam questions with full code-referenced explanations and progress tracking — built for journeyman, master and apprentice exam prep.
Thousands of NEC practice questions with code-referenced answers
- Arrow (alignment arrow). The reference for stub-ups and offsets. Line it up with your mark when the measurement runs from the end of the conduit to the bend.
- Star. The back of a 90°. Use it for back-to-back bends, when you measure to the back of the finished 90 rather than to the end.
- Rim notch or teardrop. The center of a bend. Use it for the 45° center bend of a three-point saddle.
- Degree marks. Sight lines at 10°, 22.5°, 30°, 45° and 60°. The bend has reached the angle when the conduit lines up with the mark.
- Hook and foot pedal. The hook holds the conduit in the shoe. Heavy foot pressure on the pedal keeps it in the groove and stops kinks.
Milwaukee’s bender instructions spell out the working rule: mark the conduit, line up the mark with the right indicator, and bend to the angle. If you pick the wrong indicator, the bend lands in the wrong place even when your measurements are perfect.
The words you will hear on site
- Take-up (deduct) — the amount you subtract from a stub height so the 90 comes out the right length
- Shrink — the length an offset or saddle “uses up”, which you add to the measurement to the obstacle
- Gain — the length you save because a bend follows a curve rather than a sharp corner
- Kick — a single bend of less than 90°, usually to clear a wall or come off a surface
- Dog-leg — two bends that are not in the same plane, the most common bending mistake
- Box offset — a small offset, usually at 10°, to bring conduit into a box flush with the surface
Offset vs three-point saddle vs four-point saddle
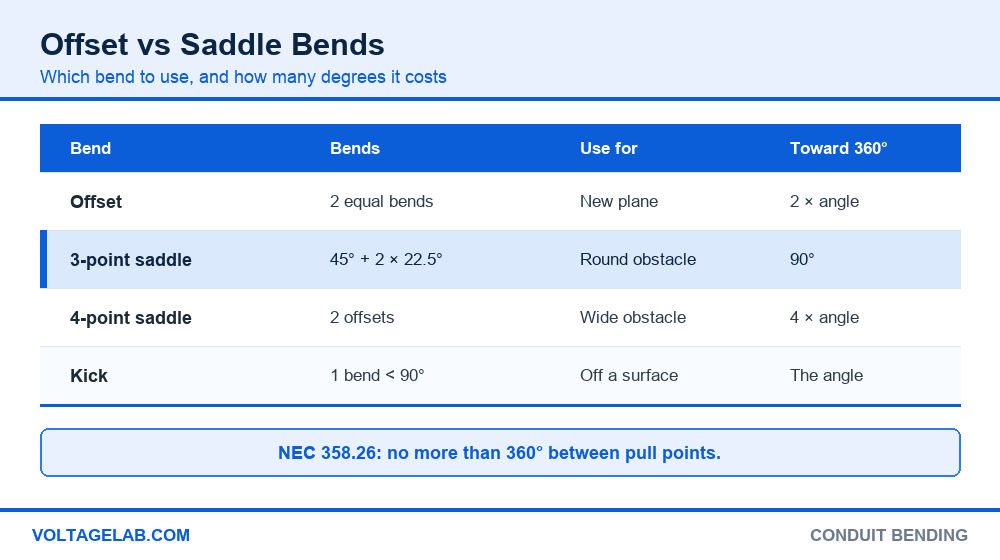
All three move conduit around something. The difference is whether the conduit comes back to the plane it started on, and how wide the obstacle is.
| Bend | Bends | Use it for | Counts toward 360° |
|---|---|---|---|
| Offset | Two equal bends, opposite directions | Moving to a new plane: off a wall, into a box, past a beam | 2 × angle (60° at 30°) |
| Three-point saddle | 45° center, two 22.5° outer | Crossing a round obstacle such as a pipe, back to the same plane | 90° |
| Four-point saddle | Two offsets, four bends | Crossing a wide or square obstacle: duct, beam, cable tray | 4 × angle (120° at 30°) |
| Kick | One bend under 90° | Coming off a surface or turning a shallow corner | The angle |
Pick a three-point saddle when the obstacle is round and narrow. Pick a four-point saddle when it is flat on top or wider than the center bend can clear. A four-point saddle also lets you choose a shallower angle, which makes the wire pull easier.
The 360° trap: NEC 358.26 limits EMT to 360° of bends between pull points — conduit bodies and boxes — and offsets and saddles count. Two 90s use 180°. Add a three-point saddle (90°) and two 30° box offsets (120°) and you are at 390°, which fails inspection even if every bend is clean. Count the degrees on paper before you bend, and add a pull point if the total goes over. RMC, IMC and PVC have the same limit in 344.26, 342.26 and 352.26.
Offset and saddle multipliers — the layout tables
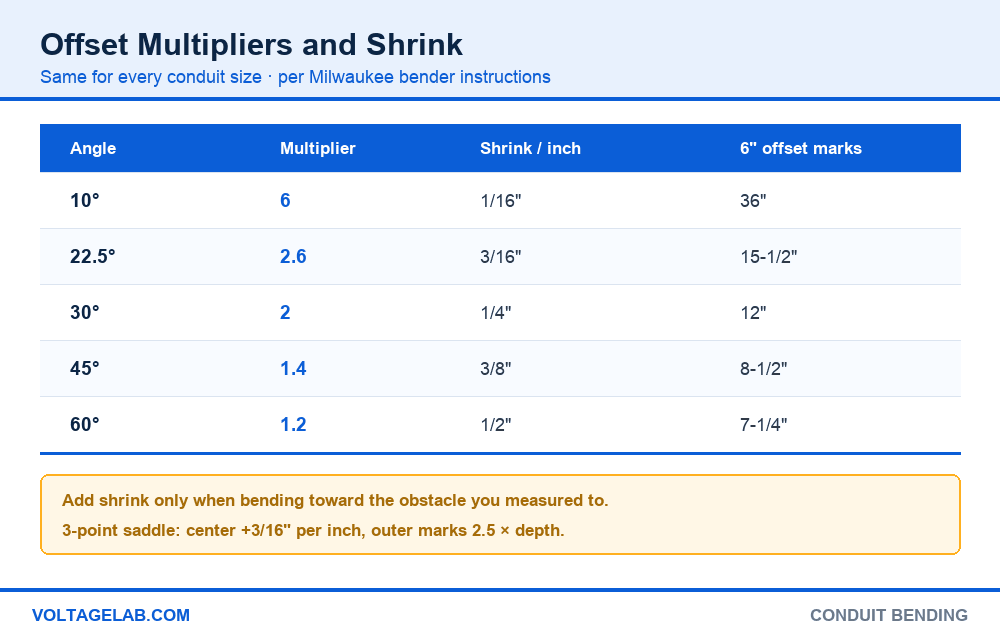
The multiplier tells you how far apart to put your two marks for an offset of a given depth. Shrink tells you how much the conduit shortens. Both depend only on the angle, so the same table works for every conduit size:
| Offset angle | Multiplier | Shrink per inch of depth | Example: 6″ offset, distance between marks | Example: 6″ offset, shrink |
|---|---|---|---|---|
| 10° × 10° | 6 | 1/16″ | 36″ | 3/8″ |
| 22.5° × 22.5° | 2.6 | 3/16″ | 15-1/2″ | 1-1/8″ |
| 30° × 30° | 2 | 1/4″ | 12″ | 1-1/2″ |
| 45° × 45° | 1.4 | 3/8″ | 8-1/2″ | 2-1/4″ |
| 60° × 60° | 1.2 | 1/2″ | 7-1/4″ | 3″ |
The multipliers are rounded cosecants of the angle. The exact values are 2.613 for 22.5°, 1.414 for 45° and 1.155 for 60°, which is why the tables round the distance between marks. For box offsets and short depths the rounding does not matter. For a deep offset over a long run, a 45° offset laid out at 1.4 comes out about 1/10″ shallow per 10″ of depth.
How to bend an offset, step by step
Step 1 — measure the depth. The offset depth is how far the conduit has to move: from the surface it is on to the surface it needs to be on.
Step 2 — pick the angle. 30° is the default: easy math, a moderate pull and little shrink. Use 10° for box offsets, 22.5° when you need a gentle pull, and 45° or 60° only when the space is tight.
Step 3 — find the first mark. Measure from the end of the conduit to the obstacle. If you are bending toward the obstacle, add the shrink (depth × shrink per inch) and mark there.
Step 4 — mark the second bend. Measure back from the first mark by depth × multiplier, toward the end of the conduit.
Step 5 — bend. Line up the arrow with the first mark and bend to the angle. Roll the conduit 180°, slide it to the second mark, check that both bends are in the same plane, and bend to the same angle.
How to bend a three-point saddle
Measure from the end of the conduit to the center of the obstacle, and measure the saddle depth — the height you need to clear. Then:
Study smarter with VoltageLab
Built for electricians, apprentices, and electrical engineers who want faster practice and better exam prep.
⭐️ Join thousands of electricians upgrading their skills
- Move the center mark ahead of the obstacle’s center by 3/16″ per inch of saddle depth. That is the center shrink.
- Place the two outer marks 2-1/2″ per inch of saddle depth on each side of the center mark.
- Line up the center-of-bend mark (rim notch or teardrop) with the center mark and bend to 45°.
- Slide the conduit, line up the arrow with one outer mark and bend to 22.5°.
- Roll the conduit 180°, line up the arrow with the other outer mark, and bend to 22.5° in the same plane.
Worked example from Milwaukee’s instructions: a 2″ pipe whose center is 15″ from the box. The saddle depth is 2″, so the center mark moves 3/8″ ahead to 15-3/8″. The outer marks go 5″ either side of it, at 10-3/8″ and 20-3/8″. The conduit comes out 3/4″ shorter overall than it would have been straight.
How to bend a four-point saddle
A four-point saddle is two offsets. Lay out the first offset to rise to the saddle depth just before the obstacle, using the offset table. Measure the width of the obstacle to place the start of the second offset, and lay that offset out to come back down. Bend all four at the same angle, and keep every bend in one plane. The first and last bends are made with the arrow. The two inside bends are where most dog-legs happen.
Stub-up 90 and back-to-back bends
For a stub-up, subtract the take-up from the stub height you want. Mark the conduit at that distance from the end, line up the arrow, and bend to 90°. For a back-to-back, make the first 90, then measure to where the back of the second 90 needs to be, line that mark up with the star, and bend with the hook facing away from the first bend.
| EMT size | Stub-up take-up (Klein) | Bender centerline radius (Klein) | Min. radius, NEC Ch. 9 Table 2 (one-shot / full shoe) |
|---|---|---|---|
| 1/2″ | 5″ | 4″ | 4″ |
| 3/4″ | 6″ | 5-1/2″ | 4-1/2″ |
| 1″ | 8″ | 7-3/8″ | 5-3/4″ |
Example: for a 12″ stub in 1/2″ EMT on a bender with a 5″ take-up, mark the conduit at 7″ from the end, line up the arrow and bend to 90°. If your bender is stamped with a different take-up, use that number. Bend one scrap stub and measure it, and you will know.
The one that catches everyone: shrink only matters when you bend toward the obstacle you measured to. If you measure from the end to a beam and lay out the offset from the far side, working back toward the end, the shrink falls on the free end and the offset lands where you marked it. Decide which way you are working before you mark, not after the first bend.
NEC rules for field bends — 358.24, 358.26 and Chapter 9 Table 2
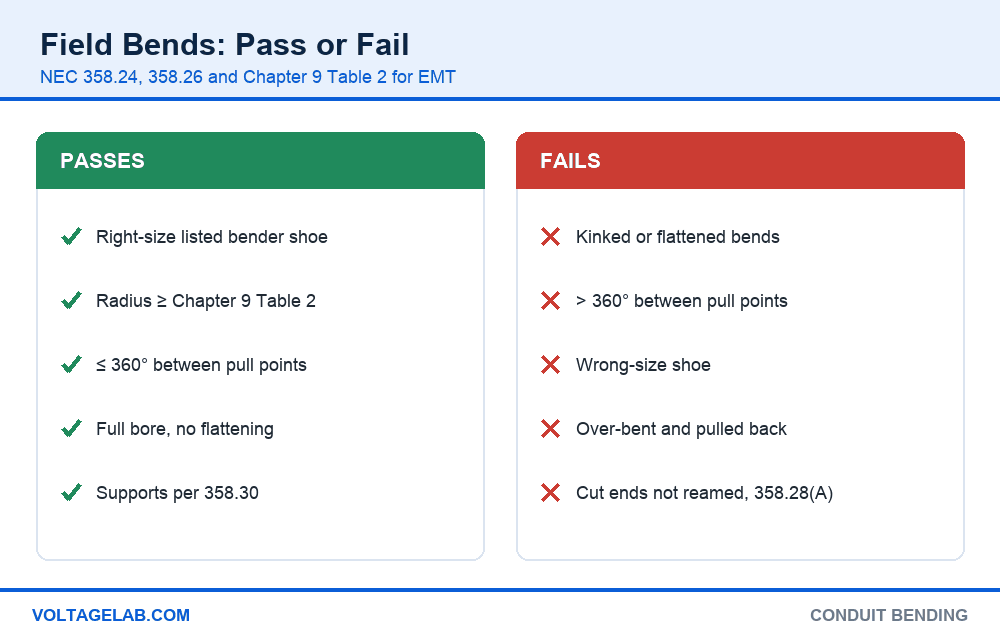
The Code does not care how you lay out a bend. It cares what the finished bend does to the conduit and to the pull. For EMT, NEC 358.24 requires bends to be made so the tubing is not damaged and its internal diameter is not effectively reduced, with a radius not less than Chapter 9 Table 2. NEC 358.26 limits the total between pull points to 360°.
Acceptable
- Bends made with a listed bender shoe of the right size for the conduit
- A radius at or above Chapter 9 Table 2 for the bending method used
- Up to 360° of bends between pull points, offsets and saddles included
- Factory elbows, which count toward the 360° the same as field bends
- Supports within 3 ft of each box and every 10 ft, as NEC 358.30 requires
Fails inspection
- Kinked or flattened bends that reduce the inside diameter
- More than 360° of bends between pull points
- Bends made with the wrong-size shoe, which can flatten the conduit
- Cracked coatings or split seams from over-bending and bending back
- Cut ends left un-reamed, which NEC 358.28(A) prohibits because burrs strip insulation on the pull
Counting a run’s degrees
Add every bend between two pull points: each 90 is 90°, each offset is twice its angle, a three-point saddle is 90° (45 + 22.5 + 22.5), and a four-point saddle at 30° is 120°. If the total is over 360°, put in a conduit body or pull box. Our guide to pull box sizing under NEC 314.28 covers sizing it. Fewer degrees also means an easier pull, so the conductors you pulled through the raceway arrive undamaged. That matters most for THHN on long runs.
Hand bender vs other ways to bend conduit
| Method | Hand bender | Mechanical (ratchet) | Hydraulic / electric | PVC heat bending |
|---|---|---|---|---|
| Typical sizes | 1/2″–1-1/4″ EMT, small rigid | Mid sizes, rigid and IMC | Large EMT, rigid and IMC | PVC of all common sizes |
| Same layout math | Yes | Yes, own take-up | Yes, own take-up | Yes, bent by hand on a form |
| Portability | Carry it anywhere | Cart or stand | Heavy, needs power or a pump | Heater box or blanket |
| Speed on repeats | Depends on you | Moderate | Fast and consistent | Slow while it heats |
| Code rule for bends | 358.24, 358.26 | 344.24, 342.24 and .26 | Article .24 and .26 for the raceway | 352.24, 352.26 |
The layout method in this guide works with every machine. Only the take-up and the marks change, so read the chart on the bender you are using. PVC is a different material: our comparison of Schedule 40 vs Schedule 80 PVC covers where each is used. Before you bend anything, size the raceway with the conduit fill chart or NEC Annex C. If the run ends at a flexible connection, see liquid-tight conduit. For a bending calculator on your phone, QuickBend is the most-rated option in our best electrician apps roundup.
Practice the math before you waste a stick
The Electrical & Electrician App (also on Android) turns any topic into a short daily study plan with quizzes. Type “conduit bending” and drill offsets, shrink and the 360° rule until the numbers are automatic. Studying for your license? The NEC Journeyman Exam app (also on Android) has 2,700+ NEC practice questions, raceway rules included.
Bending conduit in the field
Do
- Count the degrees between pull points before the first bend
- Bend a test stub with a new bender and measure its real take-up
- Pin the conduit with heavy foot pressure so it stays in the groove
- Sight down the conduit after every second bend to check the plane
- Use a sharp pencil or marker and mark all the way around the pipe
Avoid
- Using a 1/2″ shoe on 3/4″ conduit, or the reverse
- Over-bending and pulling back, which weakens the wall
- Forgetting shrink when you bend toward the obstacle
- Rolling the conduit by eye instead of checking 180° on the second bend
- Bending close to a coupling or the threaded end
Frequently asked questions
What is a saddle bend in conduit?
A saddle bend takes conduit over an obstacle and back down to the same plane. A three-point saddle uses a 45° center bend and two 22.5° outer bends. A four-point saddle uses two offsets.
What is the multiplier for a 3-point saddle?
2.5. Place each outer mark 2-1/2″ per inch of saddle depth from the center mark, and move the center mark 3/16″ ahead of the obstacle’s center per inch of depth. Some electricians use 2.6, the 22.5° offset multiplier. The difference is small on shallow saddles.
What is the multiplier for a 30-degree offset?
2. Multiply the offset depth by 2 to get the distance between your marks, and add 1/4″ of shrink per inch of depth. A 4″ offset at 30° needs marks 8″ apart and shrinks 1″.
What is the take-up on a 1/2-inch EMT bender?
Klein lists a 5″ stub-up height for its 1/2″ EMT bender, and 6″ and 8″ for its 3/4″ and 1″ EMT benders. Other models can differ, so use the number stamped on your bender, or bend a test stub and measure it.
How many degrees of bends are allowed in a conduit run?
360° between pull points, under NEC 358.26 for EMT and the matching .26 sections for RMC, IMC and PVC. Offsets, saddles and kicks count, and so do factory elbows.
Which offset angle should I use?
30° for most offsets, because the math is easy and the pull stays moderate. Use 10° for box offsets, 22.5° for an easier pull on long runs, and 45° or 60° only when space is tight. Steeper angles shrink more and make the wire harder to pull.
What is a dog-leg?
Two bends that are not in the same plane, so the conduit twists instead of lying flat. Prevent it by rolling the conduit exactly 180° between offset bends and sighting down the pipe before the second bend.
The bottom line
Good bending is good layout. Learn the five marks on the bender head, the offset table and the three-point saddle rule of 3/16″ and 2-1/2″ per inch of depth, and most of your misses go away before you put a foot on the pedal. The two restraints that keep the run legal are the 360° limit between pull points in NEC 358.26 and a bend that keeps the conduit’s full bore under 358.24.
Check your bender’s stamped take-up once, count your degrees before you bend, and keep every bend in one plane. Raceway and bending rules show up on the licensing exam too, so test yourself with our free NEC practice test.
FREE PRACTICE TOOL
Think you'd pass this on a real exam?
Test what you just read with instant-feedback quizzes built around real code questions — not generic trivia.
5
Code standards
10,000+
Active learners
100%
Free to start
Instant explanations on every answer, right or wrong
NEC, BS7671, AS/NZS, CEC, and DIN VDE covered
Bite-sized quizzes you can finish in 5 minutes
No signup required to try your first quiz
No account needed · Takes less than 2 minutes